Durian in SS2 Kuala Lumpur

SE At Home In Kuala Lumpur

I am finally back home in Kuala Lumpur for a short visit after 1.5 years away. It is always good to be home, to spend time with my parents, visit the small number of friends I still have here and of course, to catch up with all of the Malaysian delicacies I miss when I am abroad.

Although I have a two week holiday, I will only be in Malaysia for a total of 3 full days. Having landed on Saturday evening, I am flying off to visit the Yunnan Province in China on Tuesday afternoon and will only be back on Sunday evening. I am then off to Krabi Island in Thailand on the following day for 3 nights, returning to Kuala Lumpur on Thursday evening before flying back to London on Saturday morning.

3 days in Malaysia is way too short a time to reacquaint myself with all of the food I have been missing. I have made a good attempt at getting through my “To Eat” list though! If you have not come across Malaysian or South-East Asian food before, I recommend you try some of the items on this list if you ever get the chance to. 😉

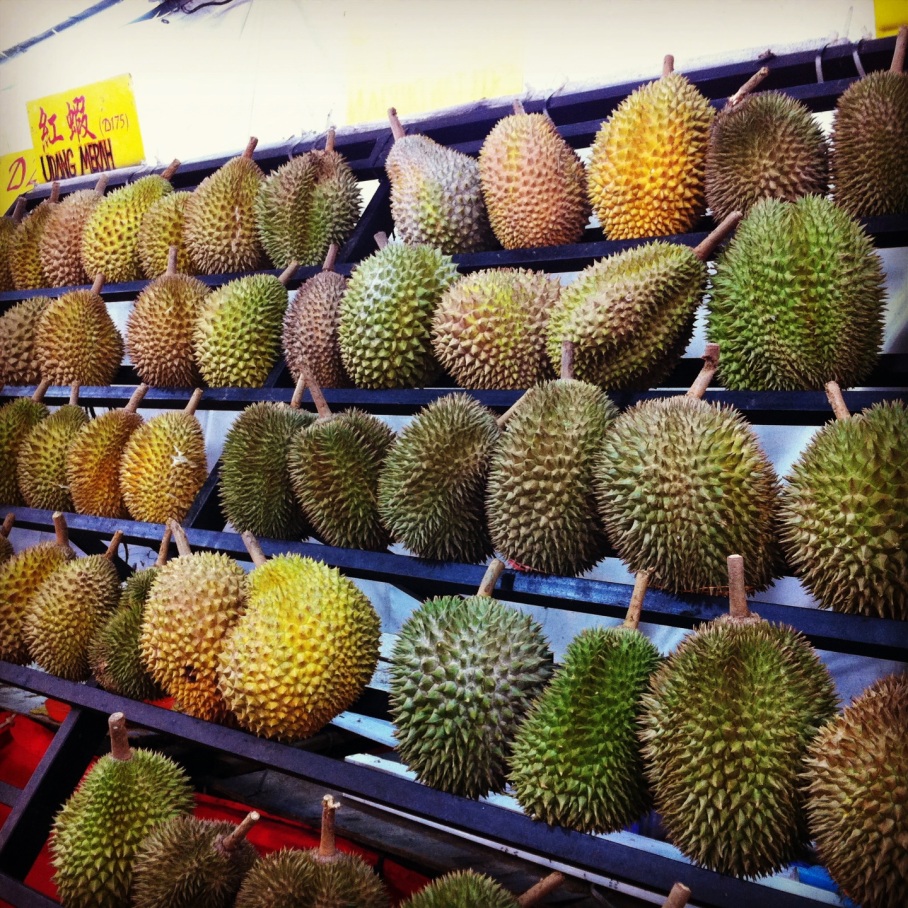
  1. Durian – definitely an acquired taste. It is extremely pungent with a very strong taste. It’s a bit like marmite – you either love it or hate it.
    Durian in SS2 Kuala Lumpur

    Dessert post-dinner, 3 hours after landing in Kuala Lumpur. This was an important one to get in quickly!

    Durian in SS2 Kuala Lumpur 2

  2. Eating at the local chinese “coffee shop” – these “coffee shops” actually serve food throughout the day. You get to choose from a wide range of local Chinese Malaysian dishes, which are sold by various different hawkers, each selling their specialty dish.
    Popiah

    Popiah with shed loads of chilli

    Char koay teow

    Amazingly good char koay teow with chinese sausage and extra chilli. This is essentially wok fried flat noodles with beansprouts, eggs, cockles, prawns and spring onions. You just don’t get the real deal in London. I would fly home just for this…

  3. Visiting the “pasar malam” – this translates to night market which is exactly what it sounds like. Street sellers set up shop in specially designated streets where you can find all sorts of things from fresh food to clothes to homewares. I tend to go for the food (surprise, surprise).
    Cempedak goreng

    Deep fried batter covered cempedak (jackfruit)

    Tau fu fah

    Hot tau fu fah…or cold, doesn’t matter, both taste divine.

    Coconut jelly

    A nice change from coconut water – coconut jelly in a coconut

  4. Eating at a Malaysian Indian restaurant – fresh fishes and meat marinated in curry powder, assorted sauces, pickled vegetables and thick, spicy sauce. All eaten on a banana leaf.

    Indian mamak food

    Proper Malaysian Indian food

  5. Eating a hot, steamed pau – my favourite are the ones filled with kaya. Ahh, so good!

    Pau with kaya

    Hot steamed “pau” with “kaya”. Pau is a bun with filling in the middle. This one comes with “kaya”, a sweet paste made of eggs, coconut milk, sugar and pandan leaf.

  6. Trying some of the more interesting Malaysian drinks
    Soya bean and cincau

    Soya bean and cincau (grass jelly – which is confusingly actually made out of seaweed)

    Milo Dinosaur

    Milo Dinosaur, a really random Malaysian drink. This is an iced Milo, topped with hefty servings of Milo powder (yup, something every Malaysian kid has surely concocted at some time or other!)

  7. Grabbing a quick Malaysian snack at the local “mamak” – mamak stalls are casual open restaurants selling affordable food to locals who want to just chill or socialise

    Roti Tisu

    Roti Tisu – translates to tissue bread. It is paper thin, crispy and sweet. Don’t ask me how they get it to stay in that shape!

    Roti Bakar

    Roti Bakar – literally burnt bread. This is essentially toast, with margarine and kaya

So all of the above in 2 days so far (plus more off the record). I think I’m onto a good start. 😉

Have you ever tried Malaysian food? Any of the above look appealing to you (you can say no!)? 🙂

4-Hour Chef – Lesson 3 – Coconut Cauliflower Curry Mash

This was a great little lesson, resulting not only in a decent new skill learnt, but also a great new recipe.

As mentioned in the 4-Hour Chef, this recipe results in a dish that ends up with a similar-ish look and texture to mashed potatoes, which if you’re avoiding carbs, is a great alternative.

I hardly ever buy and cook white cauliflower because I find the taste pretty bland on its own, and I don’t know of any good recipes to liven it up – up to now. It also helps that this recipe is pretty easy to follow, with very few ingredients needed.

Ingredients

  1. Cauliflower
  2. Unsweetened coconut milk
  3. Curry powder
  4. Salt
  5. Cashews (which I didn’t add because I’m not a fan of nuts in savoury food)
Cauliflower - check. Coconut milk - check.

Cauliflower – check. Coconut milk – check.

First up, cook the cauliflower in 180ml of coconut milk (and cashews) for 20 minutes. It is a lot easier if you break the cauliflower up into pieces before hand (wrap in a towel and smash the stem against the table until it breaks into little florets).

Boil the cauliflower florets in the coconut milk...

Boil the cauliflower florets in the coconut milk…

Remove from the heat, add salt and a pinch of curry powder. Use a fork and mash until it has a mashed potato-like consistency.

...and mash!

…and mash!

Verdict: An extremely tasty and relatively healthy dish which definitely livens up the cauliflower! I will definitely be making this again in the future.

Skills:

  • mashing – failed, I think the cauliflower could have done with more boiling (or maybe on a higher heat setting). It was just too difficult to mash up with a fork! I will need to practise this one again.

Bonus points:

  • N/A for this week
Bumpkin South Kensington 1

Bumpkin @ South Kensington and Sushinho @ Liverpool Street

As mentioned in my last weekly summary post, I managed to check off two London restaurants that had been on my Food List.

First up was Bumpkin. These guys serve seasonal British food in a number of locations around London. I went to the one in South Kensington and had originally wanted to try their brunch menu, but found out that they only serve brunch up to 1pm (we were there at 1.45pm). Shame. Guess I’ll need to revisit. 😉

Bumpkin South Kensington 5

A very homely setting

Bumpkin South Kensington 4

I had the classic British fish and chips, something which I haven’t had in AGES! It was cooked to perfection.

Bumpkin South Kensington 2

I ordered a side of sprouting broccoli to go with my fish

Bumpkin South Kensington 3

Sis has the cow pie. That sounds dirty for some reason… maybe it’s just me.

I would have stayed on to try out their desserts, but had to save some space for dinner when I planned to go all out at Sushinho. We went to the newly opened restaurant near Liverpool Street and were not disappointed! Sushinho is a restaurant that serves Japanese food (sushi, sashimi, tempura) as well as food found in Brazilian churrascarias. The two mix surprisingly well! Apologies in advance for the poor photos though – the restaurant was dimly lit and I’m always a bit wary of using flash photography in restaurants and try to keep it to a minimum.

Sushinho 1

The menu – there were too many things we liked the sound of and really wanted to try!

Sushinho 2

The sushi bar area – those sushi “cooks” make sushi art

Sushinho 3

Fresh ginger beer

Sushinho 4

Sashimi 10 plate

Sushinho 5

Spider soft shell crab roll – you can just about make out the tempura crab complete with legs at the end of the roll

Sushinho 6

Pork belly with kale and beans, along with two sticks of pork crackling

Sushinho 7

Fried mushrooms though you can hardly tell from the photo (sorry once again)

Sushinho 8

Amazing piece of medium-rare steak with cassava chips on the side

Sushinho 9

We browsed the dessert menu but in the end, both decided to go with the special of the day as seen below…

Sushinho 10

Acai berry and banana ice cream with bananas, strawberries and cactus syrup. Amazing. Seriously amazing. I’ve never even heard of cactus syrup before but it was good!

4-Hour Chef – Lesson 2 – Scrambled Eggs

Right so I’m definitely more than a few days behind on my Tim Ferriss 4-Hour Chef cooking course and my next “class” update is well overdue. I will say that I have been progressing behind the scenes so it’s not that I haven’t been practising my cooking skillz, it’s just that I haven’t had the time to write some blog posts about them.

Lesson 2 was about scrambled eggs and how to create flavour combinations using various herbs and spices. This lesson, though simple, was really interesting as:

  1. It taught me how to cook scrambled eggs properly! (it seems that it’s not just about stirring eggs continuously over a heated pan at high heat!); and
  2. It introduced me to the use of new spices and how to pair them up with other herbs and spices. I’m looking at you cumin. You can laugh, but I really had no idea what cumin was before this. Following the need to buy this spice to complete this lesson, I have found myself really liking cumin and now use it in other dishes. Star student? I think so!

As suggested in the book, I tried recreating both the Northeast African and Middle Eastern tastes. The idea here is that eggs have a fairly neutral taste, so you can really teach yourself about herb and spice combinations by trying them out on eggs as you chop, change and mix your herbs and spices around.

For instance, back home in Malaysia, I would always always ALWAYS eat my eggs with soya sauce and white pepper. Always. That’s just what we do. I still do that now in fact. JD, who’s French, usually looks a little confused and appalled when I make my eggs that way. Stereotypically, he makes his eggs with cheese and herbs. 😛

For a Northeast African taste however, try using garlic, ground cumin and dried mint. For a Middle Eastern taste, use dried parsley and lemon instead. The book actually provides a reference table with various cuisines from around the world and how to create the flavour combination for that cuisine using 3-5 ingredients. Very interesting and very handy.

Maybe it doesn't look that appetising pictured like that but that went down my pie hole in a flash!

Maybe it doesn’t look that appetising pictured like that but that went down my pie hole in a flash! I think that was the Middle Eastern one, but who knows, it disappeared too quickly! 🙂

Verdict: Whilst I didn’t experiment by changing the ratio of my egg yolks to egg whites as suggested (to experience the change in texture and “creaminess” of my eggs), I thought that my flavour combinations experiment worked extremely well. The eggs came out nicely done and very tasty.

Skills:

  • scrambling eggs – passed
  • combining herbs and spices to create a specific flavour – passed, though this will be a long running learning process

Bonus points:

  • N/A for this week

Maltby Street Market

I visited the Maltby Street Market for the first time almost exactly one year ago now and blogged about it here. You will see that all of the photos from my older blog posts are now missing, as I made the switch late last year to a self hosted site and all the photos from my old blog were not transferred in their entirety when I made the move.

As the sun was out and the skies were clear this morning, I decided to pay a visit to the market again, just to check out the latest vibe and to see if there were any new food stalls worth a try. It was buzzing! The narrow alley street was completely filled with foodies and there were lots of food waiting to be tried.

As much as I would’ve loved to sample food from all the various stalls, lack of time and limited cash in my wallet would not permit me to do so and I had to make do with “just” an authentic French chocolate eclair and a superb beef brisket in a crispy warm bun. Absolutely delish!

Photo 20-04-2013 12 33 04

Photo 20-04-2013 12 40 04

Photo 20-04-2013 12 40 51

Photo 20-04-2013 12 42 16

Photo 20-04-2013 12 44 18

Photo 20-04-2013 12 46 13

Photo 20-04-2013 12 46 44

Photo 20-04-2013 12 48 04

Photo 20-04-2013 12 58 31

Photo 20-04-2013 12 59 53

Photo 20-04-2013 13 00 23

Photo 20-04-2013 13 02 56

Photo 20-04-2013 13 04 19

Photo 20-04-2013 13 06 04

Photo 20-04-2013 13 06 51

Photo 20-04-2013 13 10 28

The reason for the limited time I had to spend at the market was because I had to rush off for an appointment with a sports massage therapist. This is the first time I have ever treated myself to a sports massage (as they are pretty darn expensive!) but I wanted to make sure that my muscles are in good shape following my recent marathon and 58 mile cycle, in addition to the 3 months of training leading up to it.

Expensive as it was, my sports massage therapist was gooood. It was a painful 60 minutes as she worked through my legs, glutes and upper back but I felt a lot better afterwards. I asked her what she thought about the condition of my muscles, worried about the answer she would give (I wasn’t ready to hear something along the lines of, “You should think about giving your body more rest“). Surprisingly, she said that my muscles were in good condition! (I love her already!) There were small clumps of damaged tissue here and there, but all in all, she said that I should keep up with whatever I was doing as everything was working well. Phew!

As the sun was still out when I was done, JD and I decided to don our sunnies and head out for a spot of leisurely walking and shopping. Armed with a Starbucks coffee, we headed off to enjoy the rest of the afternoon.

Sunshine in the Capital

Starbucks caramel macchiato

Hope you all had a nice day wherever you are, with sunshine and blue skies!

4-Hour Chef – Lesson 1 – Osso “Buko”

So let’s jump straight into lesson 1. Osso “Buko”. When I read that, I just thought, what the hell? Good luck to self if this was lesson numero uno. The more I read on about the procedure however, the more I realised that lesson 1 was actually about braising, or slow cooking as it were. Now that, I can do!

As with a lot of other slow cooking recipes, there wasn’t really a need to do a lot of prep before the “cooking”. I had ordered 4 lamb shanks as part of my last online grocery delivery, in addition to the cheapest bottle of white wine on sale, so that was the two main ingredients out of the way.

As luck would have it, this week also saw my first home delivery of my new weekly standing order of Abel & Cole organic fruit and veg. If you are not familiar with the name, these guys do a weekly home delivery service of organic food, sourced direct from farmers (delivery only within the UK). They also do meat, milk, yogurts and other kitchen staples, in addition to their more standard fruit and vegetables. As they focus on only sending across food that is currently in season in the UK, you do not get to choose exactly what goes into your weekly box, but you can tell them what you categorically do not want. Each box comes with a recipe to help you make use of all your food, in case you come across something you’ve never tried before and do not know how to cook. I’ve only had one delivery but am very pleased so far.

Abel and Cole Fruit and Veg small box

My first Abel and Cole Fruit and Veg box. I was pretty impressed and enjoyed my fresh, organic goodies. Bonus was a free veg cookbook and a giant bulb of garlic (I’m a sucker for freebies…).

But getting back on topic, this week’s box included some organic carrots and a free giant bulb of garlic which was just what I needed for this recipe. After some peeling of carrots and crushing of garlic, we were good to go.

Osso Buko 1

Ingredients prepped. Ready to start.

The process basically comprised placing the lamb shanks on a bed of carrots, adding squashed whole tomatoes and its sauce, adding white wine and flicking some garlic on top.

Osso Buko 2

Prepping the lamb shanks in the crock pot

I’ll put up my hand at this point and say that the recipe actually called for this to be oven cooked for 2 hours, rather than cooked in a slow cooker for 5 hours (which is what I did). I figured that since one (out of two) of the skills we were meant to learn in doing this was “braising”, a slow cooker was a suitable alternative.

Osso Buko 3

This is what it looked like after 5 hours on “high”

Verdict: Yes, the dish came together, and the lamb was super soft and tender and went well with the carrots. However, personally speaking, I don’t particularly like lamb meat and find the taste and smell of it to be too strong (and not in a good way). I also don’t drink a lot of alcohol generally, and could really taste the white wine in this dish, which I didn’t really fancy. JD on the other hand had no such qualms and said he quite enjoyed it, so there you go.

Skills:

  • braising – passed
  • blade grip – failed, forgot to practice using the proper grip when cutting my carrots. D’oh.

Bonus points:

  • zesting – a lemon. Though not onto the main dish, but into a bottle to be kept in the freezer for future use.

The 4-Hour Chef

If you’ve been following my blog for a while, you will have ascertained by now that I am a pretty rubbish cook. I can just about follow recipes (even then, not 100% of the time), but have mostly found cooking to take too much time, with too much need for specific tools and a constant need to go to the grocery store to buy the necessary ingredients. It just doesn’t fit in all that well with my life schedule.

However, I am trying to change my ways and would like to do more quality cooking, and incorporate it into my life in a more sustainable way. This is due to a few good reasons:

  • To save money – eating out in restaurants constantly in London is expensive
  • To learn a new life skill – eating is a core part of life
  • To improve my health by eating more healthily – eating restaurant food tastes great (most of the time) but it isn’t always super-healthy!
  • To deepen relationships by cooking for others – I have been invited over to friends’ houses where they have cooked up delicious meals for me in the past. It would be nice to return the hospitality at some point in my life, as I believe food is a great bringer-together (yes, that’s a word I made up).

Enter Timothy Ferriss4-Hour Chef.

4 Hour Chef

If you’ve chanced across Tim before, or have read any of his previous two books (4-Hour Workweek or 4-Hour Body), his latest book won’t need any introduction as you’ll know what Tim is all about.

For those who haven’t heard of the 4-Hour series however, WHERE HAVE YOU BEEN? I’ll leave it to you to check out his Wikipedia page and previous TED talk in your own time, but in summary, Tim is basically all about hacking life and finding the most effective shortcuts through work, the human body, cooking and basically anything else.

I’ve read all of his previous books, and though I may not agree with everything he says, I do always tend to leave his books having learnt something new or thinking about standard processes in a new way that I have never thought of before. I was therefore pretty excited to learn that he was going to tackle cooking for his latest book – we all know how much help I need in this area!

Having now had a chance to read through the first part of the book, I can tell you that (of course!), this is no ordinary cookbook. Tim spends a lot of time talking about the concept of learning and retaining information effectively, as he makes it clear that he wants you to be able to cook something from feeling / memory rather than always having to rely on recipes, something which I am well on-board with!

After months and months of this tome sitting by my bedside, I finally managed to complete the reading up to the part of the book that starts the cooking lessons, as it were. Happily, I even managed to act on what I read, what with the long Easter Weekend affording me a lot more time than I would normally have. Going forward, I thought it might be fun to document how I progress, and as with my running training, it will hopefully keep me accountable and spur me on to keep going with the “cooking lessons”.

What’s in it for you? Well you can laugh at my sorry attempts at cooking. 🙂

As an aside, but not wholly unrelated to this, I recently decided to replace by old wooden chopping board with this cute and practical Joseph Joseph Index Advance Large chopping board set. I know that people say you shouldn’t mix your veg and meat chopping boards. I’ll admit that I’ve never made a distinction between the two in the past, and touch wood, nothing major has ever happened to me to make this a cause for concern. However, going forward, I am going to try to be more aware of this, especially as I (hopefully) start experimenting with different types of meat and food more generally.

Joseph Joseph large index cutting board 1

Joseph Joseph large index cutting board

Organised cutting boards – I like it!

Are you excited? I KNOW you’re excited, so stay tuned…

Chicken Cacciatore in a Crock Pot

As you guys know, I went on a mini-ski trip 2 weeks ago. What you probably won’t know is that I really started missing my new crock pot when I was there. I had used it for the first time a few days before leaving and loved my concoction of green chillies and pork loin. I was even somewhat looking forward to coming back to my flat to try something new!

As usual, I went back to my favourite healthy food website and found a recipe for Chicken Cacciatore, which to be honest, was somewhat similar to my first crock pot dish (albeit somewhat milder, and using chicken instead of pork). I did however, put a little bit more effort into this attempt and browned the meat before inserting into the crock pot, which was done in an attempt to enhance the dish. I don’t know how much of a difference it actually made, but the result was scrumptious!

The recipe below makes quite a large portion, which was perfect as it allowed me to freeze a fairly large portion for easy ready-meals on future busy weekdays / nights. I’m not sure it’ll last long though – it was really good (even on my cut down recipe version of the original)!

Ingredients

  • 10 portions of chicken – mix of thights and drumsticks, all including the bone
  • 2 medium sized cans of chopped tomatoes
  • 2 chopped bell peppers
  • 1 chopped onion
  • Dried italian herbs
  • Salt, pepper and sliced garlic

Procedure

  1. Remove all the skin and fat from the chicken. This is the most annoying and time consuming part. I am particularly anal about this though. :/
  2. Brown chicken in a lightly oil pan. Add salt and pepper.
  3. Add chicken into the crock pot.
  4. Add onions, peppers and garlic. Cover with the chopped tomatoes. [Note that it probably makes a hell lotta sense to brown the onions and peppers in the pan first as well, but I forgot because I’m a dunce.]
  5. Add the dried herbs on top and stir.
  6. Cook on high for 5 hours, followed by 1 hour on medium.

Photo 17-03-2013 17 36 39

I have to say that I was initially a little worried about there not being enough liquid in the pot to cook the chicken properly. I just spread the tomatoes around evenly as best I could, placed the cover on top, and prayed that I wouldn’t come home to a burning flat.

Happily, all went well and I can assure you that no additional liquid is needed. I guess the chicken releases water when it starts cooking (or whatever), so it all evens out in the end.

Photo 17-03-2013 22 38 13

I had the chicken with the veg sauce on it’s own, but it would go great with brown rice or quinoa for a fuller, more balanced meal.

I’m going to need to start considering other crock pot recipes which DON’T use tomatoes as a base next. Any suggestions? Amy, I’ve still got your cream cheese chicken chilli recipe in mind! 😉

Skiing in Laax, Switzerland

This is how my skiing has progressed in recent times:

  1. December 2011 – Skiing for what was effectively the first time in Les Arcs, France. This was a last minute booking with just JD and myself. Painful first few days as I learnt how to ski with a bit of guidance from JD the ski expert (can I just say that getting your partner to teach you something is not always the best option). Extremely sore knees and bruises galore. However, managed to conquer the green and blue slopes. Shaky on the red slopes, but was getting the hang of it by the end of the 4 day period. Had to sit a lot of afternoons out as I didn’t have the strength to do a full day’s worth of skiing. Still wasn’t sure if skiing was really the sport for me at this point.
  2. December 2012 – Second time skiing, this time in Zermatt, Switzerland. This time, JD and I went with three others, O, Richy and C. Annoying frustrating first few hours as I tried to get back into it. However, conquered the blue and red slopes by the end of the holiday and successfully did a black slope. Apart from the first afternoon, I took no time off and skied continuously throughout the week. The scenary and backdrop in Zermatt was utterly gorgeous. The service, food and people in the area were top notch. I was definitely feeling the skiing vibe and could totally see how one could really get into skiing. I was finally starting to understand what JD had been harping on about everytime we talked about skiing, since the first time we met. Considering it was my first time meeting our other three companions, I had a blast with everyone and it was seriously good fun.
  3. March 2013 – I returned to London in Jan 2013 and almost immediately started missing the skiing trip. I met up with O who mentioned she was planning another ski trip in March and asked whether we wanted to join. No need to ask twice, I was definitely in. Richy was also up for another ski session so we planned a 3.5 days trip to Laax in Switzerland. Blues and reds were no problem. Blacks still make my heart pound a little and are physically challenging, but I no longer had any real problems with them. I also started going off-piste with the rest of my more experienced skiing mates. Another really fun trip with some crazy memories to take back to London. In fact, it was such good fun that we’ve already decided that we need to do another ski trip come Winter 2013/14!

IMG_0292

Here are some of the highlights.

The resort

Laax Skiing 1

Laax Skiing 21

Laax Skiing 13

The scenery

Laax Skiing 2

Laax Skiing 4

Laax Skiing 5

Laax Skiing 6

IMG_0328

Laax Skiing 15

Laax Skiing 18

Laax Skiing 19

Laax Skiing 20

The food

Laax Skiing 7

Laax Skiing 8

Laax Skiing 9

Laax Skiing 16

Laax Skiing 17

The apres-ski and crowds

Laax Skiing 3

Laax Skiing 10

Laax Skiing 11

Laax Skiing 12

Laax Skiing 14

Chocolate Chip Clouds

So, as mentioned here, I attempted to bake some Chocolate Chip Clouds on Sunday. As usual, my severe lack of culinary skills meant that I didn’t achieve exactly what I set out to do, but the end product was pretty decent regardless. The reason why I ended up with more flat, stratus clouds as opposed to Gina’s fluffy cumulus clouds was probably because I decided to just make things up as I worked through the recipe. I’m not sure I’m ever going to learn…

Chocolate chip clouds 2

Not so much fluffy clouds as just flat clouds

My amended recipe was as follows:

  • 9 tbsp egg whites – should’ve been room temperature but i took it fresh out of the fridge. I also may have used 8 tbsp instead of 9. I don’t know, I lost count half-way through.
  • 1/8 tsp cream of tartar – meh, this was a guestimate. I may have put in 1/6th or 1/5th. Who knows.
  • 1/2 cup sugar – I have no cup measurements at home, so I don’t really understand how “cups” work. I used roughly 225g instead. This was the website I used for the conversion ratios.
  • 1 tsp vanilla extract
  • 2 tbsp unsweetened cocoa powder
  • 1 cup chocolate chips – Again, no idea what 1 cup was, so I used 100g of chocolate chips + 80g of expired Liquid Chocolat drinking chocolate. It was only 6 months expired. All good people, all good.
  1. Heat oven to 150°C / 300°F
  2. Cover cooling tray with greaseproof paper
  3. Use a blender and blend the egg whites at high speed. Add sugar, cream of tartar and vanilla and continue blending.
  4. Add cocoa to the mixture. Mix.
  5. Add chocolate chips and drinking chocolate. Mix.
  6. Drop tablespoonfuls of mixture onto tray and bake for 22 minutes. Original recipe called for 35-45 minutes but mine got burnt after keeping them in the oven for that long.

You may want to check the original recipe before trying my awesome amended version, because it is clear to see that I definitely did NOT do it the intended way at all.

I ended up with 24 glorious chocolate chip clouds using my measurements.

Well actually, no sorry, I lie. I overcooked the first batch of 9, so I ended up with 15 glorious chocolate chip clouds. Baking for 22 minutes leaves the center soft and chewy which is the way I like it. Keep it on for longer if you want proper crisp mouthfuls.

Remember to cool them down before eating though, as they taste loads better after they’ve had some time to chill out. I enjoyed them even more 2 days later, so these guys keep really well too!

According to the flat’s resident food critic, they passed with flying colours so I promise you, amended recipe or not, these little fluffy wonders are GOOD (and super easy to make!).

Happy baking!